Hi, readers! My name is Alina and I am a data scientist at Innova. In this article, I’d like to share my experience with fine-tuning Llama 2 on a single RTX 3060 for the text generation task and how I evaluated the results. Since it’s my very first post on Medium, feedback and tips are welcome!
A little disclaimer: This project is a text generation experiment and I do not support fake news generation and publishing.
Why do you need this article?
In today’s rapidly evolving field of Natural Language Processing (NLP), it is essential for researchers to keep up with new emerging technologies. Fine-tuning large language models has become a crucial technique for tailoring these models to specific tasks and domains.

It enables you to adapt powerful pre-trained models to your specific needs, improving their performance on a wide range of NLP tasks. However, the intricacies of fine-tuning and its compatibility with specific hardware can be daunting. This article shows the entire process of fine-tuning, evaluating results, and provides practical insights.
Main Concept
The main idea is to compute the cosine score between the generated text and the reference text using SentenceTransformers embeddings to evaluate the quality of new text generation using Llama 2 (see more in the section below).
For this it is possible to use USA News Dataset from Kaggle. It contains four columns: “news_id”, “title”, “abstract”, “category”.
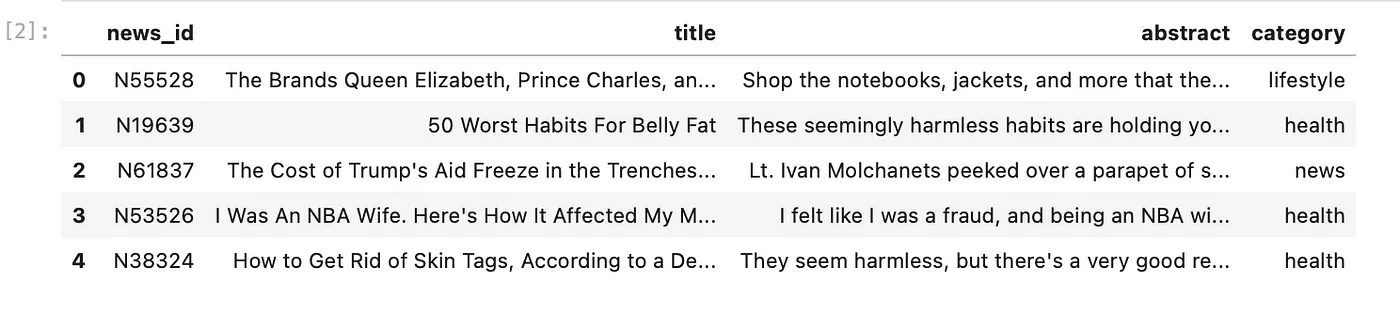
The focus will be on the “title” and “abstract” columns as it’s intended to fine-tune Llama 2 to generate new abstracts based on the provided titles, so the “abstract” column will serve as a reference text when assessing the final result. Moreover, this dataset is ideal for fine-tuning on medium-tier GPUs since the medium length of the “abstract” column is no more than 150 characters. With all the necessary preparations and context in place, let’s get started!
Getting Access to Llama 2
You’ve probably already heard about this model, so let’s figure out why it is so cool and how we can use it.
The Llama 2 language model represents Meta AI’s latest advancement in large language models, boasting a 40% performance boost and increased data size compared to its predecessor, Llama 1. Llama 2 offers three distinct parameter sizes: 7B, 13B, and 70B. Additionally, it is open source, allowing users to explore its capabilities freely for both research and commercial purposes without charge.
Consider the requirements for this project:
Model: We will be using the meta-llama/Llama-2-7b-hf, which is the smallest Llama 2 model.
Access to the model: To work with Llama 2, you will need to request access through the following steps:
- Complete the form on the official Meta website.
- Ensure that you have a Hugging Face account (your email address should match the one you used on Meta’s form).
- Generate a Hugging Face token.
- Accept Hugging Face’s license terms and acceptable use policy on one of the Llama 2 model pages (version 7B, 13B, or 70B).
While it is possible to use huggingface-cli login, in this project, I will import an .env file with the token using load_dotenv. You can find more information about user access tokens in the official Hugging Face documentation here.
Dataset Preprocessing
For our preprocessing task we will need pandas and scikit-learn to implement train/test split.
import pandas as pd
from sklearn.model_selection import train_test_split

df = pd.read_csv("news_text.csv", sep="\t")

df.shape
Output: (51282, 4)
Let’s check if the dataset has any missing values.
df.isnull().sum()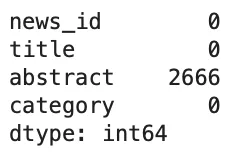
As you can see, the ‘abstract’ column contains empty values, let’s drop them.
df = df.dropna(subset=["abstract"])
df.shape
Output: (48616, 4)
Now, we can combine ‘title’ and ‘abstract’ columns. We will use this resulted column for further tokenization and fine-tuning. The process of combination looks like this:
# combine title and abstract to form input prompts
df["input_prompt"] = (
 "TITLE: " + df["title"] + "\n" + "ABSTRACT: " + df["abstract"]
)
Here is the output of the combined column:
TITLE: 25 Photos of the Royal Family at Balmoral Castle, Queen Elizabeth's Favorite Home
ABSTRACT: The royal family has been visiting the Scottish estate for more than a century.
Now, we are ready to do the train/test split:
# train-test split
train_en, test_en = train_test_split(df, test_size = 0.3, random_state=42)
As you can see here, we get a 30% test size and a 70% train size — a traditional split.
The last but not least, shape checking:
# check shapes
print("Train Data Shape:", train_en.shape)
print("Test Data Shape:", test_en.shape)
Output: Train Data Shape: (34031, 5); Test Data Shape: (14585, 5).
Now, it’s time to dive into the process of fine-tuning!
Model Fine-tuning

For this segment, I found valuable guidance here, which served as my source of inspiration. An essential aspect of that code is find_all_linear_names function. It’s a real game-changer for me as it eliminates the need for manually specifying target modules when setting up the Peft Config.
Now, let’s shift our focus to the important functions we’ll be using, starting with ‘load_model.’ Note, that I parse the access token with dotenv.
def load_model(self, device_map="auto"):
    # load the pre-trained model and tokenizer
    model = AutoModelForCausalLM.from_pretrained(
        model_id,
        quantization_config=quant_config,
        token=hf_auth,
        device_map=device_map,
        )
    tokenizer = AutoTokenizer.from_pretrained(
        model_id,
        use_auth_token=hf_auth,
        )
    tokenizer.pad_token = tokenizer.eos_token

    return model, tokenizer
Our next step involves crafting a quantization configuration using bitsandbytes library (more info on github). Since we are using RTX 3060 for this experiment, we will quantize in 4bit. The specific settings are as follows:
def create_quant_config(self):
    return BitsAndBytesConfig(
        load_in_4bit=True,
        bnb_4bit_use_double_quant=True,
        bnb_4bit_quant_type="nf4",
        bnb_4bit_compute_dtype=torch.bfloat16,
)
As demonstrated in the original code, we will wrap everything as a PeftModel. Within ‘target_modules,’ we pass modules identified with:
modules = find_all_linear_names(model)
I have also slightly tweaked some parameters compared to the ones featured in my inspirational code. For instance, I’ve set ‘r’ to 8 instead of 16, ‘lora_alpha’ to 32 rather than 64, and ‘lora_dropout’ to 0.05. These parameters are flexible, so feel free to tailor them to your preferences.
def create_peft_config(self, modules):
        # create a configuration for the LoRa method
        config = LoraConfig(
            r=8, # dimension of the updated matrices
            lora_alpha=32, # parameter for scaling
            target_modules=modules,
            lora_dropout=0.05, # dropout probability for layers
            bias="none",
            task_type="CAUSAL_LM",
        )
        return config
Let’s define these parameters:
| Parameter | Description | |
|---|---|---|
| r | This parameter represents the dimension of the updated matrices in the LoRa method. A value of 8 suggests that the updated matrices will have a dimensionality of 8. Higher values of r can capture more complex relationships but may require more memory and computation. Lower values of r may lead to simpler representations. The value of 8 seems reasonable in our case. | |
| lora_alpha | This parameter is used for scaling within the LoRa method. A value of 32 indicates the scaling factor applied during certain operations within the method. The choice of lora_alpha depends on how much you want to scale the updates during partial evaluation. | |
| target_modules | These modules are the focus of the LoRa method and where the updates and scaling will be applied. | |
| lora_dropout | Dropout is a regularization technique, and its value typically ranges from 0 (no dropout) to 1 (full dropout). A value of 0.05 (5%) is a good starting point. | |
| bias | This parameter appears to specify the type of bias used in the method. In this case, it’s set to “none,” indicating that no specific bias is applied as part of the LoRa method. | |
| task_type | This parameter defines the type of task you are performing with the PEFT model. “CAUSAL_LM” suggests that the model is designed for a causal language modeling task, where the model predicts the next word in a sequence based on the previous words. |
The important part is to load our processed dataset. Here’s my code for loading the train and test datasets using the load_dataset method from the Hugging Face Datasets package. After that, I tokenize the input_prompt column with the custom function.
# load datasets
train_dataset_path = "train_dataset_path" # path to your train dataset
test_dataset_path = "test_dataset_path" # path to your test dataset

dataset = load_dataset("csv", data_files={"train": train_dataset_path,
 "test": test_dataset_path})

# tokenization preprocessing function
def tokenization_preprocess(column_name, dataset):
    def tokenize_fn(x):
        return tokenizer(x[column_name], padding=True, return_tensors="pt")

    tokenized_ds = dataset.map(tokenize_fn, batched=True)
    return tokenized_ds

# tokenize the input_prompt
tokenized_ds = tokenization_preprocess("input_prompt", dataset)
Phew, have I covered everything we need? With that, we can initialize the trainer. Here are the parameters I used for the RTX 3060:
trainer = Trainer(
    model=model,
    train_dataset=train_dataset,
    args=TrainingArguments(
        output_dir=output_dir,
        max_steps=2000,
        save_steps=1000,
        gradient_accumulation_steps=2,
        learning_rate=2e-4,
        per_device_train_batch_size=4,
        warmup_steps=2,
        logging_steps=1,
        fp16=True,
        seed=42,
        optim="paged_adamw_8bit",
    ),
    data_collator=DataCollatorForLanguageModeling(tokenizer, mlm=False),
)
More details:
| Parameter | Description | |
|---|---|---|
| model | Don’t forget to initialize the model and the tokenizer. | |
| train_dataset | The dataset containing the training data. Alas, we won’t use test dataset here to save time, since one test requires about an hour to complete. | |
| args | This is an object of the TrainingArguments class, which holds various training-related settings. Let’s explain the key arguments below. | |
| output_dir | The directory where the trained model and training logs will be saved. Don’t forget to create it. | |
| max_steps | The maximum number of training steps. Here the training will stop after 2000 steps. | |
| save_steps | How often to save model checkpoints during training. Here the checkpoint will be saved every 1000 steps. | |
| gradient_accumulation_steps | This parameter accumulates gradients over a certain number of steps before performing a weight update. It’s set to 2, which means gradients are accumulated over 2 steps before an update. | |
| learning_rate | Determines the step size during model training. A smaller value, like here – 2e-4 (0.0002), means the model adjusts its internal parameters very slowly, making training more precise but potentially slower. A larger value would make training faster but could lead to less precise results. | |
| per_device_train_batch_size | This parameter determines how many examples (or data items) are processed together in each training step. A larger batch size can make training faster, but it requires more memory. | |
| warmup_steps | Warmup steps specify how many initial training steps use a smaller learning rate before gradually increasing it. This can lead to more stable and better training results, especially in complex tasks. | |
| logging_steps | How often to log training progress. It’s set to 1, so you’ll get a log entry for every step. | |
| fp16 | Enables mixed-precision training, which can help to speed up training and reduce memory usage. | |
| seed | The random seed for reproducibility. Set to 42. | |
| optim | The optimizer used for training. | |
| data_collator | This parameter is used to collate and preprocess the data for training. Here, I’m using DataCollatorForLanguageModeling with mlm=False, indicating that I don’t intend to perform Masked Language Modeling (MLM). |
Summary
Fine-tuning with the provided configuration required approximately 11 hours. Thankfully, I didn’t observe any signs of overtraining throughout the process. It’s worth noting that the parameters mentioned above can serve as a solid starting point, but don’t hesitate to make adjustments according to your preferences and requirements.
Model Inference
Text generation and evaluation are essential tasks in the NLP world. Generating coherent and contextually relevant text is a challenging problem, and evaluating the quality of generated text is equally important. Let’s see how our fine-tuned and quantized Llama 2 handles this task.

Setting the Stage
Before we dive into the evaluation metrics, let’s set up the stage. Here is the beginning of the script:
import os
import pandas as pd
import torch
from dotenv import load_dotenv
from transformers import (
    AutoModelForCausalLM,
    AutoTokenizer,
    set_seed,
)
from peft import PeftModel, PeftConfig

# Set seed for reproducibility
set_seed(42)

# Display entire pandas column width
pd.set_option('display.max_colwidth', 150)

# Load environment variables
dotenv_path = '/project_folder/.env'
load_dotenv(dotenv_path)

# Hugging Face authentication token
hf_auth = os.getenv("HF_LLAMA2_AUTH")

# Set the device (in this case, GPU)
device = "cuda:0"

# Load PEFT model and configuration
results = "results"
peft_config = PeftConfig.from_pretrained(results)

# Initialize tokenizer from PEFT config
tokenizer = AutoTokenizer.from_pretrained(
    peft_config.base_model_name_or_path,
    use_auth_token=hf_auth
)
tokenizer.pad_token = tokenizer.eos_token

# Initialize the model from PEFT config
model = AutoModelForCausalLM.from_pretrained(
    peft_config.base_model_name_or_path,
    load_in_4bit=True,
    torch_dtype=torch.bfloat16,
    use_auth_token=hf_auth,
)

# Initialize the finetuned Lora PEFT model
model = PeftModel.from_pretrained(model, results)
model = PeftModel.from_pretrained(model, results)

# Send the model to the specified device
model = model.to(device)

# Load the test dataframe
test = pd.read_csv("test_en.csv")

# Compute the abstract colum median length
median_string_length = test['abstract'].apply(len).median()
Did you notice how I set up the PeftModel twice? It’s a weird bug I ran into. When I set it up just once, the text it generates doesn’t make any sense. But strangely enough, when I initialize it twice, the problem goes away. I wish I could explain why this happens, but I don’t have an answer for that yet.
Text Generation
With the initial setup complete, we can now proceed to the text generation task. We will generate a piece of text based on a given input prompt here.
Do you remember how we created the ‘input_prompt’ column for fine-tuning? The idea here remains the same but the ‘ABSTRACT’ is empty for the model to generate it. Don’t forget to tokenize your ‘input_prompt’:
# i chose the third row here
# feel free to experiment with any rows
input_prompt = "TITLE: " + test["title"][2] + "\\n" + "ABSTRACT: "

inputs = tokenizer(input_prompt, return_tensors="pt").to("cuda")
Now, we can specify the text generation parameters. I will use the combination of top_k, top_p, temperature, repetition_penalty, and no_repeat_ngram_size to achieve the sufficient control over generation:
# Set generation parameters
MAX_LEN = median_string_length # median length of 'abstract' column (=150)
TOP_K = 50
TOP_P = 0.9
TEMPERATURE = 0.8
REP_PENALTY = 1.2
NO_REPEAT_NGRAM_SIZE = 10
NUM_RETURN_SEQUENCES = 1

# Generate text
output = model.generate(
    **inputs,
    do_sample=True,
    max_length=MAX_LEN,
    top_k=TOP_K,
    top_p=TOP_P,
    temperature=TEMPERATURE,
    repetition_penalty=REP_PENALTY,
    no_repeat_ngram_size=NO_REPEAT_NGRAM_SIZE,
    num_return_sequences=NUM_RETURN_SEQUENCES,
)
Let’s have a deep look into the text generation parameters:
| Parameter | Description | |
|---|---|---|
| MAX_LEN | This parameter represents the maximum length of the generated text. It’s set to median_string_length of an ‘abstract’ test dataset column. | |
| TOP_K | Top-k sampling is a technique used in text generation to limit the vocabulary choices for each token. It ensures that only the top k most likely words are considered at each step. I set TOP_K to 50, meaning that at each step, the model considers the top 50 most likely words based on its predictions. | |
| TOP_P | Top-p (nucleus) sampling is another technique to control the vocabulary choices. It restricts the choices to the smallest set of words whose cumulative probability exceeds a certain threshold p. Here I set TOP_P to 0.9, which means the model considers words until the cumulative probability reaches 90% or higher. | |
| TEMPERATURE | A hyperparameter that controls the randomness of the generated text. A lower value (e.g., 0.8 as here) makes the output more focused and deterministic, while a higher value (e.g., 1.0 or greater) introduces more randomness. | |
| REP_PENALTY | Repetition penalty discourages the model from generating the same word or phrase repeatedly. A value of 1.2 means that the model is penalized for generating repeated tokens, encouraging more diverse output. | |
| NO_REPEAT_NGRAM_SIZE | This parameter controls the size of n-grams that should not be repeated in the generated text. A value of 10 means that the model will avoid repeating any 10-token sequences in the output. Smaller values will be more restrictive, while larger values allow more flexibility. | |
| NUM_RETURN_SEQUENCES | It’s set to 1, meaning you’ll get one generated sequence. |
Don’t forget that you can adjust this parameter as you wish.
Evaluation
Here is the generated text:
# decode the result
output_text = tokenizer.decode(output[0], skip_special_tokens=True)

print('TITLE:', test['title'][2])
print('----')
print('REFERENCE:', test['abstract'][2])
print('----')
print('GENERATED:' + "\\n" + hypothesis)
Output:
TITLE: California mountain climber falls after slipping on mountain
----
REFERENCE: Slip on mountains leads to climber's fatal fall.
----
GENERATED:
TITLE: California mountain climber falls after slipping on mountain
ABSTRACT: 49-year old man dies in a fall while descending from Mount Diablo.
The weather conditions were cloudy with winds of about 10 mph and
temperatures around freezing when the accident occurred.
The victim was wearing cotton clothes, which apparently provided little
protection against cold air. His friends tried to help him but he fell down
an ice patch that covered about two feet next to a dirt pathway near
the summit of the mountain. He landed face first at the bottom of this slope
where he lay unconscious for several hours until his body temperature dropped
below normal causing irreversible
The outcome looks pretty good but how can we evaluate it? Here’s the challenge: the reference and the generated result are two different pieces of text. So, we need to compare how similar they are considering their context. That’s why I decided to use sentence-transformers embeddings. After that, we will calculate the cosine similarity between the reference and the generated result.
Let’s break down the evaluation process into these steps:
- Start by creating a variable called ‘hypothesis’ and remove the title text from it.
- Next, load the sentence-transformers model. I’ll use
all-MiniLM-L6-v2. According to the official SentenceTransformers documentation, theall-*models are designed as general purpose models. Plusall-MiniLM-L6-v2is a fast model that produces good results when computing sentence similarity. For more information regarding SentenceTransformers models check the official documentation. - Compute embeddings for both the reference and the hypothesis.
- Calculate the cosine similarity and round the resulting value to three decimal places.
from sentence_transformers import SentenceTransformer, util

# check if the hypothesis starts with the title
if output_text.startswith(input_prompt):
    hypothesis = output_text[len(input_prompt) :].lstrip()

refr = test["abstract"][2]

# compute with sentence_transformers
# load the pre-trained Sentence Transformers model
model = SentenceTransformer('all-MiniLM-L6-v2')

# compute embeddings for 'refr' and 'hypothesis'
refr_embedding = model.encode(refr, convert_to_tensor=True)
hypothesis_embedding = model.encode(hypothesis, convert_to_tensor=True)

# compute cosine similarity
cosine_score = round(util.cos_sim(refr_embedding, hypothesis_embedding).item(), 3)

print(cosine_score)
Output: 0.589
Note, the cosine_score can range from 0 to 1. If it’s 1, it means the texts are identical. So, our result is not that bad.
Now, you can wrap all the inference code into a function and run it to calculate the cosine_score for the first 100 rows of our test dataset. This process will take roughly an hour on a single RTX 3060. Afterwards, here are the top 10 cosine_score results sorted in ascending order:
cosine_score = results['Cosine_Score'].value_counts().reset_index()
cosine_score.columns = ['Cosine_Score', 'count']
cosine_score = cosine_score.sort_values(by='Cosine_Score', ascending=False)

cosine_score.head(10)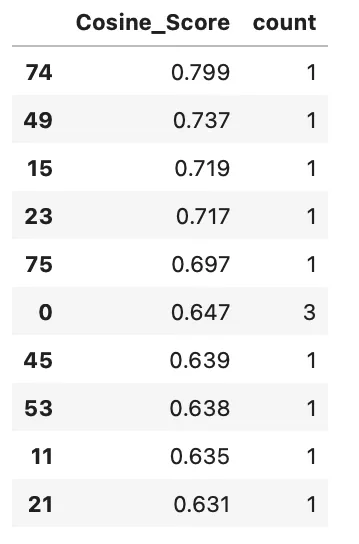
Looks promising, and the median cosine score is 0.478 – seems nice at this stage.
Conclusion & Future Steps
One significant advantage of quantization is that it allows to run the smallest Llama 2 7b model on an RTX 3060 and still achieve good results. Here are the main points I’d like to explore next:
- I want to investigate whether it’s possible to fine-tune Llama 2 on an RTX 3060 with 8-bit quantization, but with the
llm_int8_enable_fp32_cpu_offload=True, which would allow CPU utilisation. However, this would require adjusting the fine-tuning parameters to accommodate all the nuances of 8-bit quantization. - I found a problem that Llama 2 didn’t properly generate the end of text token, so sentences didn’t always end on a full stop. In the future, I want to understand why this happens and whether it’s possible to force the model to always end the generation on a dot given the logical end of the sentence.
- I also plan to compare the quality of text generation when quantization is not applied. Will the cosine_score change in this scenario?
In conclusion, I hope someone finds this article useful, and I will be glad to see any comments and additions!


