Hi everyone! I’m Artem, a data scientist at Innova. This article will cover the development process for a car detection mobile app. As this is my first post on Medium, I look forward to any feedback and ideas in the comment section!

Detecting objects in photos and videos is a common challenge, with plenty of solutions already out there. But when it comes to doing it live and fast on your smartphone, things get tricky. In this article, we’ll walk you through our journey in developing such an application, leveraging C++, TensorFlow-Lite, and Qt.
TensorFlow Lite
TensorFlow Lite is a powerful library developed by Google with the aim of making machine learning more accessible on mobile devices, microcontrollers, and other similar hardware. It is not limited to one programming language but supports multiple options, including C++, Java, Swift, Objective-C, and Python. With TensorFlow Lite, we have the flexibility to harness the potential of both pre-trained models, such as those available through TensorFlow Hub, and our own custom models that have been converted into TensorFlow Lite format. It’s important to note that when converting custom models, optimization may be required to ensure smooth performance.
Models in TensorFlow Lite can be broadly categorized into two types:
- Models with metadata: When a model comes with metadata, you can use it with the TensorFlow Lite Support Library. It contains various solutions for many tasks. For example, TensorFlow Lite includes a solution for object detection. The library itself performs the necessary operations on the input image and provides the output in a specific class format.
- Models without metadata: For models without metadata, we need to process the image ourselves and interpret the output using a pointer.
Optimizing Models with TensorFlow Lite
Model optimization is a critical step to ensure their efficient performance on mobile devices and other platforms. Through the process, we achieve the following key benefits:
- Reduced Model Size: Through optimization, we can significantly reduce the size of the model. This, in turn, facilitates swifter deployment of the model on the intended device;
- Lower Memory Usage: The optimized model consumes less memory, making it more efficient in resource allocation, a critical consideration when working with constrained hardware;
- Faster Inference Time: Optimization enhances the model’s performance, resulting in quicker inference times. This speedier operation not only benefits overall user experience but also contributes to reduced power consumption, a valuable advantage in mobile and low-power scenarios.
There are numerous optimization methods, and each of them is worth studying. When using a pre-trained model, we can employ only some techniques, for example:
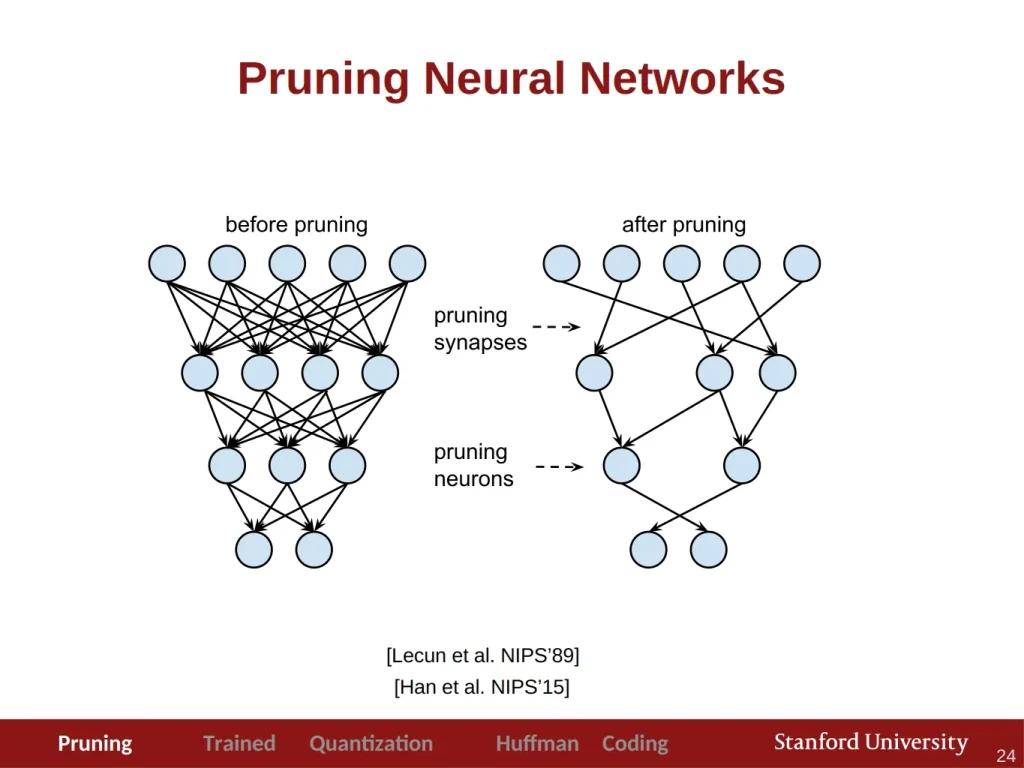
- Pruning: </bPruning is a method employed to reduce the size of a neural network or machine learning model by selectively removing specific parameters, such as weights and connections. This process can significantly enhance inference speed without compromising the accuracy. To delve deeper, check out the Stanford lecture.
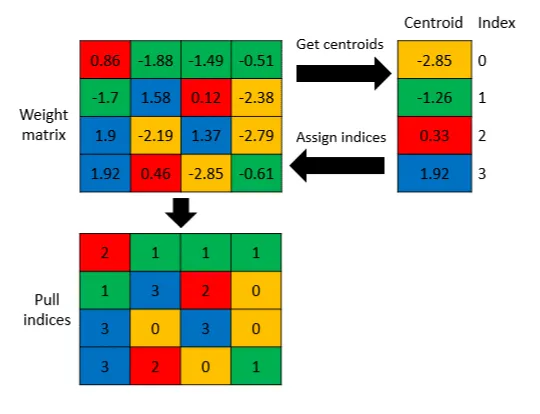
- Weight Clustering: Weight clustering is a method that reduces the storage size of your model by replacing many unique parameter values with a smaller number of unique values. This approach helps streamline the model’s storage footprint.
- Quantization: Quantization is the process of reducing the precision of numbers used to represent model weights, typically stored in float32 format, and converting them into integer numbers. While quantization can lead to reduced model accuracy, it is an effective way to optimize memory usage. To gain a more comprehensive understanding of quantization, you can explore this in the article.
Note that TensorFlow offers a toolkit for model optimization with a variety of techniques like the ones mentioned above. It helps developers to tailor their models for specific requirements, whether it’s minimizing size, maximizing speed, or optimizing for memory constraints.
Application Development Workflow

Now, let’s delve into the process of developing our application. Here’s a step-by-step guide on how we’ll achieve this:
Step 1: Building the Application with CMake
To build our application, we’ll utilize CMake. This will help us structure our project efficiently. CMake is an open source, cross-platform family of tools designed to build, test, and package software. It gives you control of the software compilation process using simple independent configuration files.
Step 2: Creating the APK File
For creating the Android Package (APK) file, we’ll employ androiddeployqt, a tool designed for packaging Qt applications for Android platforms.
Step 3: Building TensorFlow Lite Library and Delegates
Our application relies on TensorFlow Lite, and we’ll use bazelisk for building the library and its delegates. Here’s how we go about it:
- Configure the Workspace for Android: In order to set up TensorFlow-Lite for Android, we need to configure the workspace. This can be accomplished by running ./configure within the root directory.
- Building TensorFlow-Lite Library: With the workspace configured, we can now proceed to build TensorFlow Lite using the following command:
bazelisk build --config=android_arm64 //tensorflow/lite:libtensorflowlite.so- Building Delegates: Delegates, such as the GPU delegate, can be built with the following command:
bazelisk build -c opt --config android_arm64 tensorflow/lite/delegates/gpu:libtensorflowlite_gpu_delegate.soStep 4: Integration with Your Project
After building, we should integrate these components into our project. To do so, make the necessary additions to your CMakeLists.txt. Furthermore, it’s essential to include the required headers in your project. To simplify this, we add them as a git submodule and then include them using the code snippet below:
add_library(tensorflowlite SHARED IMPORTED)
add_library(tensorflowlite_gpu_delegate SHARED IMPORTED)
Importing Libraries in Three Simple Steps
Let’s discuss the process of importing libraries, which we can break down into three steps.
Step 1: Adding the Library
The first step is all about adding the library to your project. This can be accomplished using the add_library command, as follows:
# Setup tensorflowlite propertyset_property(TARGET tensorflowlite PROPERTY IMPORTED_LOCATION ${CMAKE_SOURCE_DIR}/lib/tensorflow-lite/arm64/libtensorflowlite.so) # Setup tensorflowlite deleagte property set_property(TARGET tensorflowlite_gpu_delegate PROPERTY IMPORTED_LOCATION ${CMAKE_SOURCE_DIR}/lib/tensorflow-lite/arm64/libtensorflowlite_gpu_delegate.so)
Step 2: Setting the Library Path
The second step involves configuring the library’s path using the set_property command. This allows your project to know where to find the library:
# Setup tensorflowlite property
set_property(TARGET tensorflowlite PROPERTY
        IMPORTED_LOCATION ${CMAKE_SOURCE_DIR}/lib/tensorflow-lite/arm64/libtensorflowlite.so)
# Setup tensorflowlite deleagte property
set_property(TARGET tensorflowlite_gpu_delegate PROPERTY I
        MPORTED_LOCATION ${CMAKE_SOURCE_DIR}/lib/tensorflow-lite/arm64/libtensorflowlite_gpu_delegate.so)
Step 3: Linking the Libraries
The final step is to include tensorflowlite and tensorflowlite_gpu_delegate in the target_link_libraries. This step is essential to compile your application successfully. However, it’s also important to copy these libraries to ${CMAKE_BINARY_DIR}/android-build/libs/arm64-v8a/, as this directory contains the necessary libraries that will be bundled into your APK:
file(GLOB libraries "${CMAKE_SOURCE_DIR}/lib/tensorflow-lite/arm64/*") file(COPY ${libraries} DESTINATION ${CMAKE_BINARY_DIR}/android-build/libs/arm64-v8a)Choosing the Right Model
Selecting the ideal model is a critical decision in any machine learning project. TensorFlow Hub is a valuable resource for finding a wide range of models. As the name suggests, TensorFlow Hub offers TensorFlow models tailored for various data analysis tasks. What’s particularly advantageous is that it also hosts models optimized for TensorFlow Lite. These are quantized versions of models, perfectly suited for immediate deployment on mobile devices.
For our object detection task, we chose EfficientDet-Lite0 model. It stood out due to its best metrics and its lightweight nature, making it a fitting choice even for less powerful mobile devices. In TensorFlow Hub, you’ll find several versions of this model: int8, default, and metadata versions. We decided to work with both the default and int8 quantized versions.
Here is the comparison of these two versions:
| Model\Time inference ms. | avg | min | max | |
|---|---|---|---|---|
| Default | 103.809090909091 | 58 | 444 | |
| Quant | 93.1909090909091 | 55 | 275 |
We observed that the int8 model was more consistent, displaying stable inference times without significant fluctuations when compared to the default model. This stability makes it a promising choice for our object detection task.
TensorFlow Hub Announcement
At the time of writing, we used TensorFlow Hub. However, it may no longer work since TensorFlow switched to Kaggle Models. For the up-to-date details regarding this transition, please refer to this official announcement.
Working with TensorFlow-Lite in Code
Now let’s see TensorFlow-Lite library in action.
Step 1: Defining Variables
First of all, start by defining essential variables and components:
std::unique_ptr<tflite::Interpreter> mInterpreter;
std::unique_ptr<tflite::FlatBufferModel> mModel;
tflite::ops::builtin::BuiltinOpResolver mResolver;
TfLiteDelegate *mDelegate;
uchar *mInput;
Step 2: Initializing and Preparing for Inference
Here, we initialize the model and prepare everything for inference:
// Init model
mModel = tflite::FlatBufferModel::BuildFromFile(pathToModel.c_str());
// Build the interpreter
tflite::InterpreterBuilder builder(*mModel, mResolver);
// If set to the value -1, the number of threads used
// will be implementation-defined and platform-dependent.
builder.SetNumThreads(-1);
auto status = builder(&mInterpreter);
qDebug() << "TensorflowModel::TensorflowModel. Builder status ok?:"
         << (status == kTfLiteOk);
// Allocate tensors if previously state is ok
if (status == kTfLiteOk) {
 status = mInterpreter->AllocateTensors();
 qDebug() << "TensorflowModel::TensorflowModel. Tensors allocated?:"
          << (status == kTfLiteOk);
}
if (status == kTfLiteOk)
  mInput = mInterpreter->typed_input_tensor<uchar>(0);
Step 3: Performing Model Inference
With the model and interpreter in place, we can proceed with model inference:
/**
* Performs the forward pass of the TFModel using the given QImage.
* @param image The input image to be processed by the model.
* @return A std::map<int, float> containing the model's output.
*/
std::map<int, double> TFModel::forward(const QImage &image) noexcept {
    if (mInput == nullptr) {
        qWarning() << "TensorflowModel::forward."
                   << "Model input equal nullptr.";
        return {};
      }

      const auto transformedImage = transform(image);
      const auto *inputImage = transformedImage.bits();

      if (inputImage == nullptr) {
          qWarning() << "TensorflowModel::forward. Image equal nullptr.";
          return {};
      }

      std::memcpy(mInput, inputImage, constants::model::size);

      if (const auto status = mInterpreter->Invoke(); status == kTfLiteOk)
          return processOutput();

      qWarning() << "TensorflowModel::forward. Cannot make forward;";
      return {};
}
Step 4: Transforming the Input Image
The transform method is responsible for converting the input image to the format required by the model:
QImage TFModel::transform(const QImage &image) const noexcept {
  QImage inputImage{image.scaled(constants::model::inputWidth,
                                 constants::model::inputHeight)};
  // For these model imgFormat equal `QImage::Format_RGB888`.
  // Important set the correct image format, otherwise ower predictons will
  // be wrong.
  inputImage.convertTo(constants::model::imgFormat);
  return inputImage;
}
Step 5: Processing Model Output
The final step involves processing the output from the model:
/**
* Retrieves the predictions from the model output.
* @return A map of predicted classes and their max confidence scores.
* If no predictions were made, an empty map is returned
* If on image detected few objects of the same class,
* then only the max score from it will be returned
*/
std::map<int, double> TFModel::processOutput() const noexcept {
  // Model output:
  // detection_boxes: Bounding box for each detection.
  // detection_classes: Object class for each detection.
  // detection_scores: Confidence scores for each detection.
  // num_detections: Total number of detections.

  // Get the total number of detected objects
  const int countDetected{static_cast<int>(std::floor(*getOutput<float>(3)))};

  // Get the detected classes and scores
  const auto detectedClasses{getOutput<float>(1)};
  const auto detectedScores{getOutput<float>(2)};

  // Check if the detectedClasses and detectedScores are valid
  bool itUsable{detectedClasses != nullptr};
  itUsable &= detectedScores != nullptr;

  // Initialize the map to store the predictions
  std::map<int, double> predictions;

  // Iterate over the detected objects
  // In this model, countDetected cannot be more than 25.
  for (int i = 0; itUsable && (i < countDetected); i++) {
    const auto &classId = static_cast<int>(std::floor(detectedClasses[i]));
    const auto &score = static_cast<double>(detectedScores[i]);
    const bool itDetected{score >= constants::model::threshold};

    // If the object is detected with a high enough confidence score
    if (itDetected) {
      // Add the class to the predictions map if it doesn't exist
      predictions.try_emplace(classId, 0);
      // Update the max score for the class if necessary
      predictions[classId] = std::max(predictions[classId], score);
    }
  }

  return predictions;
}
By following these steps, you can effectively work with TensorFlow-Lite within your code, facilitating model inference for various tasks. The getOutput method is a useful addition to improve code readability, allowing for a more streamlined and comprehensible implementation.
Challenges Faced
During the development process, we encountered several challenges, primarily related to the camera module integration. While it functioned smoothly on desktop platforms, it posed difficulties on mobile devices, often leading to application crashes. An illustrative example of such an error is as follows:
W ImageReader_JNI: Unable to acquire a buffer item, very likely client tried to acquire more than maxImages buffers
W ImageReader_JNI: Unable to acquire a buffer item, very likely client tried to acquire more than maxImages buffers
E AndroidRuntime: FATAL EXCEPTION: CameraBackground
E AndroidRuntime: Process: org.qtproject.example.camera, PID: 16762
E AndroidRuntime: java.lang.IllegalStateException: maxImages (10) has already been acquired, call #close before acquiring more.
E AndroidRuntime: at android.media.ImageReader.acquireNextImage(ImageReader.java:501)
E AndroidRuntime: at android.media.ImageReader.acquireLatestImage(ImageReader.java:386)
E AndroidRuntime: at org.qtproject.qt.android.multimedia.QtCamera2$4.onImageAvailable(QtCamera2.java:157)
E AndroidRuntime: at android.media.ImageReader$ListenerHandler.handleMessage(ImageReader.java:812)
E AndroidRuntime: at android.os.Handler.dispatchMessage(Handler.java:108)
E AndroidRuntime: at android.os.Looper.loop(Looper.java:166)
E AndroidRuntime: at android.os.HandlerThread.run(HandlerThread.java:65)
At the moment, the Qt team is aware of this problem and is in the process of resolving it.
This bug is fixable, but the solution requires recompiling Qt to implement the necessary changes. We discovered that the camera module operates seamlessly with Qt version 6.4, while compatibility issues arise with versions 6.2, 6.3, and 6.5.
Another challenge was related to the camera’s aspect ratio. When in a vertical position, the captured images exhibited an ultra-wide aspect ratio. As a solution we implemented a manual aspect ratio setting to ensure that the images were captured in the desired format.
Capturing Camera Images

To facilitate image capture using the camera, we’ve integrated QtMultimedia into our solution. We’ve designed a VideoHandler class equipped with a QVideoSink property. From this video sink, we extract frames, and from these frames, we obtain the images we need. However, there are some nuances to consider:
- Multithreaded Operation: To prevent any freezing of images and maintain a responsive user experience, it’s advisable to run the machine learning model in a separate thread.
- Optimizing Inference: We’ve optimized our image capture and inference process by not performing inference with every captured frame. Instead, we’ve implemented a timer to initiate inference every 1000 milliseconds
For capturing images on QML, we have the following code:
MediaDevices {
   id: mediaDevices
}

CaptureSession {
    camera: Camera {
        id: camera
        cameraDevice: mediaDevices.defaultVideoInput
        active: true
        focusMode: Camera.FocusModeInfinity
    }
    videoOutput: preview
}

VideoHandler {
    id: handler
    videoSink: preview.videoSink
}


VideoOutput {
    id: preview
    property double aspectRation: 1
    anchors.centerIn: parent
    height: parent.height
    width: aspectRation * height
    fillMode: VideoOutput.Stretch
    onFrameUpdated: {
        aspectRation = preview.videoSink.videoSize.height / preview.videoSink.videoSize.width
    }
}
In this setup, the MediaDevices component enables us to select the camera, while the CaptureSession orchestrates image capture. The VideoOutput component not only provides a live video preview but also dynamically adjusts the aspect ratio of the displayed image to match the actual video stream. This ensures a consistent and accurate preview experience for the user.
Utilizing Delegates for Enhanced Model Performance
In our journey of optimizing model performance, we explored the benefits of employing specialized delegates, such as GPU and DSP. TensorFlow-Lite offers several delegate types, each tailored for different hardware and platforms:
- GPU Delegates:
These delegates are compatible with Android and iOS devices, harnessing the power of the device’s GPU to enhance model performance. - NNAPI and Hexagon Delegates:
Designed exclusively for Android, these delegates leverage the Neural Networks API (NNAPI) and Hexagon DSP to accelerate inference. - Core ML Delegates:
Tailored for iOS, Core ML delegates are optimized for Apple devices, ensuring efficient and seamless model execution.
For more information, check out the official TensorFlow-Lite documentation.
In our project, we used GPU delegates only. However, we encountered a notable challenge. The selected model included custom operators that were designed to run on the CPU.
Despite our intentions to leverage the GPU for enhanced performance, our benchmark results, sourced from the TensorFlow Hub, revealed that GPU utilization did not significantly improve the model’s execution time. The following benchmark data illustrates the performance comparisons:
| 1 CPU (ms) | 4 CPU (ms) | GPU (ms) | EdgeTPU (ms) | |
|---|---|---|---|---|
| 49.92 | 36.77 | 48.48 | 29.26 |
As indicated in the benchmark, while the CPU showed a slight decrease in execution time when using multiple cores (4 CPU), the GPU’s performance enhancement was not substantial. These findings highlight the importance of understanding model-specific requirements and compatibility with delegates to achieve the best possible performance gains.
Conclusion
In summary, we’ve explored one approach to harnessing the power of TensorFlow Lite within a C++ environment using the Qt framework.
Throughout our journey, we have:
- Model Performance: We conducted a comprehensive analysis of different models, evaluating their inference times and performance.
- Model Optimization: We delved into techniques for optimizing models, streamlining their size, memory usage, and inference times.
- Delegates: We explored the possibilities offered by delegates, with a focus on GPU delegates and their potential impact on model execution.
In our experience, this combination of technologies has proven to be a viable option for application development. However, it’s essential to acknowledge that there may be challenges to navigate during the development process. With careful consideration and optimization, this integration can unlock the potential for powerful machine learning applications in a C++ and Qt context.